
How to Build Your First DevOps Lab with AWS CLI – Part 2
- Dec 6, 2021
- 5 min read
Updated: Dec 20, 2021
The New Norm: DevOps and Cloud
DevOps is part of every modern IT organization. Cloud is part of every modern IT organization. Combine those two facts, and you realize you need to know DevOps and cloud to advance your career. And to truly understand them, you need hands-on experience.
In this four-part blog series, you get exactly that: hands-on experience and knowledge of how DevOps works in the cloud.
In part 1 of the series we completed the setup of the AWS CLI. In part 2 we move on to configuring Putty and the AWS EC2 (Elastic Compute Cloud) instances.
Amazon’s Elastic Compute Cloud
Now that we have AWS CLI configured, we can work on getting the two instances created that we need to set up the DevOps components. One server will be the Master and the other will be the Node. The Master server will have most of the software install on it. We will leverage Amazon’s Elastic Compute Cloud (EC2) to do this. These machines are used to provide reliable compute capacity and with a host of different configurations and images. The two instances will both be t2.micro, utilizing 1GB of RAM and 1 CPU. By default, when these instances are created, they are also given 8GB of hard disk space, which is plenty for what we will be doing. You can always increase the disk space after the fact if needed, but using the t2.micro with default disk space keeps us in the free tier as long as we stay below some additional parameters.
Configuring Putty and the AWS EC2 Instances
We are finally ready to create some AWS instances! The following steps will walk you through the process to do this. I am running all my commands from an Anaconda virtual environment on a Windows machine.
Important Note: One thing to take note of is that there are parts in the following snippets where there is information you will have to replace with information from your environment. I have outlined where those sections are, if you just copy and paste the snippets below, it will not work.
Step 1: Create an SSH Key
aws ec2 create-key-pair --key-name "AWS-CLI" --query "KeyMaterial" --output text >> "AWS-CLI.pem"Step 2: List contents of the directory to confirm it was created
dir | find "AWS"
Step 3: Describe the key-pair to see that it was created in AWS
aws ec2 describe-key-pairs --key-name "AWS-CLI"
Step 4: Describe VPCs
This will display the network used by the EC2 machines. We will need the ID in the next step.
aws ec2 describe-vpcs
Step 5: Create Security Group
This allows us to configure certain ports/protocols that we want to allow to our EC2 machines.
Note: Be sure to change the VPC ID with the one in your environment.
aws ec2 create-security-group --group-name "AWS CLI Security Group" --description "Security Group used with machines created through AWS CLI" --vpc-id vpc-daf257a7
Step 6: Check Public IP

Step 7: Create rule to allow port 22 against your public IP
Note: The Group ID will need to be changed for steps 7-9 with the values in your environment.
aws ec2 authorize-security-group-ingress --group-id sg-0dc65c2550a038a8a --protocol tcp --port 22 --cidr [first_three_octets].0/24
Step 8: Create rule to allow port 8080 against your public IP. This is needed to access the web console of Jenkins installed in Part 3.
aws ec2 authorize-security-group-ingress --group-id sg-0dc65c2550a038a8a --protocol tcp --port 8080 --cidr [first_three_octets].0/24Step 9: Create rule to allow all traffic between devices in this security group
This allows communication between the two EC2 machines since they will both use this security group.
aws ec2 authorize-security-group-ingress --group-id sg-0dc65c2550a038a8a --source-group sg-0dc65c2550a038a8a --protocol -1Step 10: Get the Subnet ID. This is needed in the final step to create the instances.
Note: You may have to change the “Values” filter to a different zone depending on your geographical location.
aws ec2 describe-subnets --filters Name=availability-zone,Values=us-east-1a
Step 11: Get Image ID
This will list the available OS images that are available with the applied filter. There should only be one displayed for Ubuntu 18.04.
aws ec2 describe-images --filters "Name=name,Values=ubuntu/images/hvm-ssd/ubuntu-bionic-18.04-amd64-server-20210128" --query "sort_by(Images, &CreationDate)[].[Name, ImageId]"
Step 12: Create Instances
aws ec2 run-instances --image-id ami-02fe94dee086c0c37 --count 2 --instance-type t2.micro --key-name "AWS-CLI" --security-group-ids sg-0dc65c2550a038a8a --subnet-id subnet-ff1d89de
Step 13: View Instances
This will display all instances in a nice table format with limited information.
aws ec2 describe-instances --filters Name=instance-state-name,Values=pending,running,stopped,stopping,starting --query "Reservations[*].Instances[*].{Id:InstanceId, PublicIp:PublicIpAddress, PrivateIp:PrivateIpAddress, Type:InstanceType, Zone:Placement.AvailabilityZone, State:State.Name}" --output table
Step 14: Create Tags for the Master and Node
This allows for easy identification when determining which machine to install software on. You can optionally change the value to a different identifier if desired.
Note: You will need to change the --resources value to the Instance ID of your instances from the command above.
aws ec2 create-tags --resources i-01af0ce3383b649cf --tags Key=Name,Value=UBUNTU-MASTER

aws ec2 create-tags --resources i-0529b8b33145ec0da --tags Key=Name,Value=UBUNTU-NODE
Step 15: View instances with Tags
This will display the previous table with the added tag.
aws ec2 describe-instances --filters Name=instance-state-name,Values=pending,running,stopped,stopping,starting --query "Reservations[*].Instances[*].{Name: Tags[0].Value, Id:InstanceId, PublicIp:PublicIpAddress, PrivateIp:PrivateIpAddress, Type:InstanceType, Zone:Placement.AvailabilityZone, State:State.Name}" --output table

Putty Configuration
In the first step of the previous section, we created an SSH key. This key is used to access the terminal of the remote AWS instances. The file that was created was in PEM format, but Putty only accepts PPK. Luckily, Putty makes it easy to convert a PEM file to PPK with their PuttyGen tool.
If you use an SSH tool other than Putty, that is fine, but the following steps will only cover the Putty configuration.
To configure Putty, follow these steps:
Step 1: From PuttyGen, Click Load
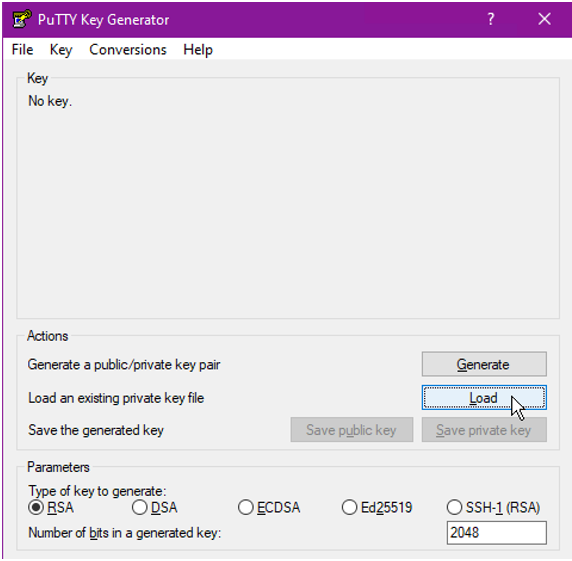
Step 2: Select the PEM file. You should get a popup that says the import was successful.
Note: You may have to change the search criteria in the bottom right to search for all files.

Step 3: Optionally input a password and click Save Private Key
The password will be needed when connecting to your EC2 instances via SSH.

Step 4: Launch Putty
On the left navigate to Connection > SSH > Auth and click Browse…
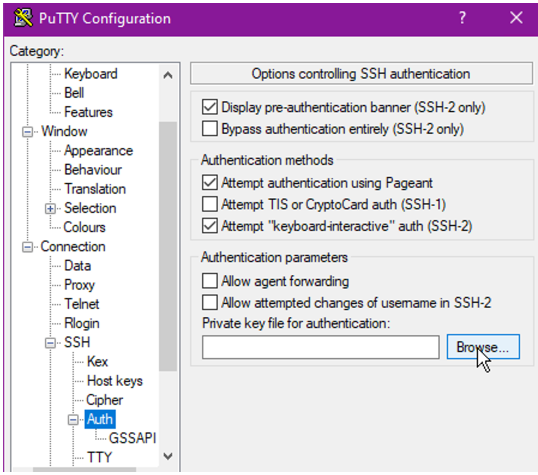
Step 5: Select the PPK file that was created from step 3

Step 6: Optionally, go back to the Session tab and save the configuration
This step saves you from having to do these steps every time.
The Journey Ahead
We now have our AWS instances created! Now what? Well, we still need to get the DevOps components installed and configured on each of the instances. Each instance has its own tasks that it will be performing, requiring different components on each. There are multiple components that will be used in the coming parts, but I won’t spoil what those are just yet. Be on the lookout for Part 3 to start seeing how everything comes together.
Still have questions or want to discuss DevOps, Automation, or Cloud further? Setup a meeting with us to see how we can help by clicking here.


Comments