
How to Build Your First DevOps Lab with AWS CLI – Part 4
- Dec 20, 2021
- 4 min read
Updated: Mar 18, 2022
The New Norm: DevOps and Cloud
DevOps is part of every modern IT organization. Cloud is part of every modern IT organization. Combine those two facts, and you realize you need to know DevOps and cloud to advance your career. And to truly understand them, you need hands-on experience.
In this four-part blog series, you get exactly that: hands-on experience and knowledge of how DevOps works in the cloud.
In part 1 of the series we completed the setup of the AWS CLI. In part 2 we configured Putty and the AWS EC2 (Elastic Compute Cloud) instances. Then, in part 3 we turned to setting up Jenkins and Ansible. In this final blog, we will complete our lab setup by configuring the Node instance to leverage Docker and run validation tests.
The Purpose of the Node Instance
The main purpose of the Node instance is to split out some of the compute for the automation. It also shows the true power of some of these components and their versatility. The Node instance is used to run the Docker containers that will be pushed via Ansible from the Master node. These containers can be provisioned and deprovisioned rapidly depending on how the pipeline is configured in Jenkins. We could have set the Node instance up as an actual node inside of Jenkins, taking Ansible out of the equation, but what fun is that?
Configuring the Node Instance with Docker
If you aren’t familiar with Docker, it is a very powerful virtualization platform that leverages the OS instead of a hypervisor to create what is called containers. These containers are meant to be very lightweight and only have installed what is necessary. Because of this, they provide the perfect environment for testing as there is no question as to what is installed. Only what you specify is installed, and it is the same every time.
Step 1: Login to the Node instance as the "ubuntu" user.
Step 2: Install Docker on the Node.
a. Allow apt to use a repository over HTTPS.
sudo apt install apt-transport-https ca-certificates curl software-properties-common
b. Add the Docker GPG Key to the list of keys used by apt to authenticate packages.
curl -fsSL https://download.docker.com/linux/ubuntu/gpg | sudo apt-key add - 
c. Add the Docker repository.
sudo add-apt-repository "deb [arch=amd64] https://download.docker.com/linux/ubuntu bionic stable"
d. Update apt to make use of the new repository.
sudo apt update
e. Install Docker on the Node.
sudo apt install docker-ce -y
f. Check that the dockerd service is running.
sudo systemctl status docker
Step 3: Install Pip.
sudo apt-get install python3-pipStep 4: Install docker-py to be able to deploy Docker machines from Ansible.
sudo pip3 install docker-pyStep 5: Update the Authorized Keys file on the Node with Public Keys from the Master.
Note: These keys should have been copied to an external editor in part 3 of our series.
a. Edit the authorized_keys file on the Node.
Note: This file should already exist with contents for the SSH Key used to authenticate when connecting to the EC2 instance.
sudo vi ~/.ssh/authorized_keys
b. Insert copied contents into a new line and save the file.
Running Validation Tests
There are a few validations that need to be done to ensure everything is working as expected. Those include running modules from Ansible and then running a Jenkins pipeline. The Jenkins pipeline pulls from a GitHub repository that I created to make it extremely easy to test this configuration in Jenkins. With the Jenkins pipeline, a Docker image will get created on the Node instance via Ansible with a web server. Jenkins will then verify the web server is accessible, looking at the response code from a curl command. After it confirms everything is good, it will delete the Docker image as it is no longer needed. If everything works, you are good to go!
Step 1: On the Master instance, verify Ansible connectivity to the Node instance.
ansible all -i inventory -m ping
Step 2: You should also be able to do this logged into the Jenkins account and specifying the Ubuntu user.
sudo su -s /bin/bash Jenkins
ansible all -i inventory -m ping -u ubuntu
Step 3: From the Jenkins web Console, navigate to Manage Jenkins.

Step 4: Click Manage Nodes and Clouds.

Step 5: Select the Cog on the far right of your Master device and click Environment Variables at the bottom. Enter the following and click save:
a. Name: REMOTE_NODE
b. Value: IP of your Node instance
Note: This value is used in the Jenkins file for the pipeline that will be built in a future step. If the name is not the same, the test will fail.

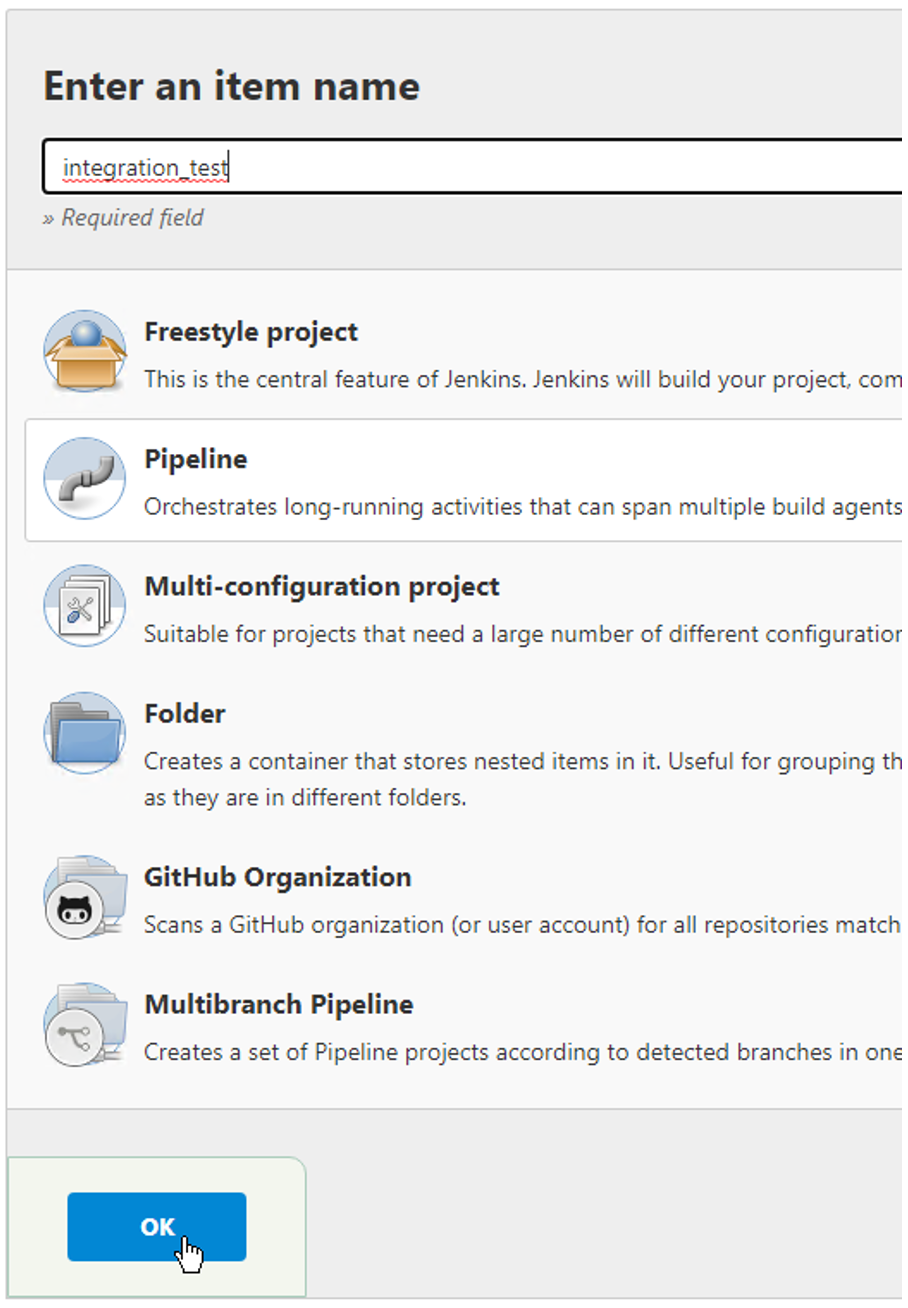
Step 6: Navigate back to the dashboard and click New Item.

Step 7: From there, input a name for the item and select Pipeline. Then click Ok.
Step 8: Scroll to the bottom and input the following:
a. Definition: Pipeline script from SCM
b. SCM: Git
c. Repository URL: https://github.com/zthurmond/aws_cli_jenkins.git
d. The rest of the components can be left at their default values. Click Save.

Step 9: On the left, click Build Now.

Step 10: You should see everything complete successfully if properly configured.

And with that…you have a working DevOps lab in AWS!
If you followed along and built out the lab successfully, congrats! You now have a working environment that you can play around with and learn more about the different components implemented in this lab build. These components are very popular. If you are looking to get into the DevOps field, it is in your best interest to learn them. I hope you enjoyed building a DevOps lab with AWS CLI!
Still have questions or want to discuss DevOps, Automation, or Cloud further? Setup a meeting with us to see how we can help by clicking here.


Comments